![Locable Logo 3a3a3a Gray.png]](https://help.locable.com/hs-fs/hubfs/Locable%20Logo%203a3a3a%20Gray.png?height=50&name=Locable%20Logo%203a3a3a%20Gray.png)
Available for all plans on the Locable Marketing Platform
Promoting events on your website and beyond is fast and easy with our simple events form.
Your events can appear on your website, be distributed to Google Business Profile (formerly Google My Business), used in your Express Email Newsletter, and pushed to local Community Calendars all at once.
NOTE: Published events will automatically appear on your website once you've created at least one calendar and "Embed it on your website". Learn more about adding a calendar here.
To ensure reliable event data, we require every event to include a title, description, location, date, and time while other fields such as an image, price, and links (to buy tickets, etc) are optional.
To get started, you can add events through a couple of paths...
Go to Promote > Events and select 'New' OR click 'Promote an Event' on your main Dashboard

Adding Your Event
Be sure you have the basic details of your event ready when you are creating an event to post on your calendar.
-
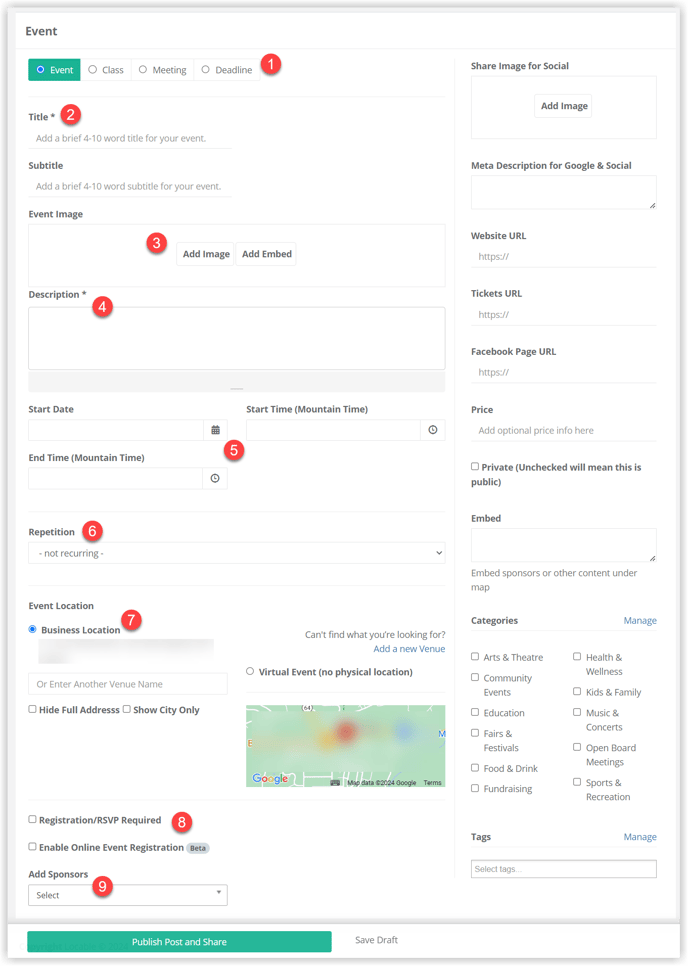
Set The Type of Event - Event, Class, Meeting, Deadline.
-
Title - This is critical for readership, social media engagement, and even SEO. Keep it clear and simple but include enough that people know what it's about and include keywords or phrases that will resonate with your audience.
-
Image or Media - Every post should have an image (Add Image). You can either upload a new image or browse images already uploaded to your Media Library.
We recommend using a photo—like people enjoying a past event or an image that captures the event’s vibe—instead of uploading a flyer as the main event image. Flyers are often packed with text that gets cut off or is hard to read, especially on mobile devices. Plus, because that text is embedded in the image, it’s not readable by screen readers, which means it’s not ADA-compliant.
A clean, high-quality photo draws more attention, works across all devices, and keeps your content more accessible.
Pro Tip: If you want to share the flyer, you can upload it as a downloadable PDF to your Media Library and link to it in the event description!
You also have the option to embed a video here. Please be sure to follow the procedure to properly embed a video on your website.
-
Description - This is the core content of your event post—help people quickly understand what it is and why they should attend. It doesn’t have to be long; bullet points are great!
Be sure to include:
-
What’s happening (activities, entertainment, special guests)
-
Who it’s for (families, adults, kids, etc.)
-
Why it’s worth attending
-
Any important notes (bring a chair, register ahead, etc.)
-
-
Time & Date - Set the date of the event as well as the start and end times. Be sure to use the calendar and clock to set the date and time.
NOTE: When setting the time, you want to use the clock to select AM or PM, then both the hour and the minutes (you need to select 00 even if it's sitting on 00, for example). Then it should fill the field, and you can move on to the next.
- Repetition - If this is a recurring event, you have the option to set the schedule to Daily, Weekly, Monthly, or Yearly.
When Your Event Has the Same Time Each Day: If your event repeats on multiple days with identical start and end times, you can use the recurring event schedule feature:
-
Set the start time and end time for your event.
-
Set the schedule for your event.
-
Post the event for the first date with its specific start and end time.
-
After publishing, use the “Copy Event” feature to clone/duplicate the event.
-
Update the date and times for the new instance.
-
- Location - You can set the location of the event - it will default to your business's location, but you can adjust this if needed - including making it virtual. If the location doesn't appear in the dropdown, simply click Add a New Venue link to the right. That venue will then be available for use in the future as well.
- You have the option to require an RSVP or Online Event Registration and/or payment for the event (depending on your plan).
- If your Event has Sponsors, you can profile those sponsors in the event listing using our Sponsor Tool.
NOTE: When adding your image for the event, a 'preview image' will be viewed in the full Calendar. The preview image is 4:3 aspect ratio - anything larger than 640x480 will be cropped to fit. Once the event post is opened, the full image will appear.
Additional Settings
There are a variety of Additional Settings you can define for your Event. These are found in the side panel of the main event data.

We recommend you add a Share Image and Meta Description to improve sharing on social media.
NOTE: The Share image will be displayed as the preview image in the calendar, and will be the thumbnail image shown when the event is shared to social media.
If you are creating a specific image for this space, the rendered size of the preview image on the calendar is 275 × 215 px.
You can add other optional data such as the price or external URLs (ticketing URL, Facebook Event post URL, etc) that will link away from your site for more information.
If the 'Private' option is selected, it will exclude the event from displaying on other calendars that share your events (i.e. private events will only be viewed on your own calendars).
Save Draft - You can save the draft of your event to complete later.
Publish Post and Share - Once you have completed inputting your event details, you will need to click 'Publish Post and Share' for your event to appear in your embedded calendar on your website. Once published, your event will appear in a mobile and search-optimized way.
Pro-Tip: Create recurring events and clone similar events to save time.
Sharing to Google Business Profile
Our Google Business Profile integration allows you to push events to your profile and to sync your Company Data, including the logo image and hero image in About Your Business > Business Profile.
Google Business Profile images must meet these additional requirements:
-
All photos must measure a minimum of 250px on the short edge, with a file size of at least 10240 bytes.
-
These photos must be JPG or PNG.
Sharing on Facebook
To ensure your event content looks great when shared on Facebook, we recommend following their current guidelines:
- Remove Unnecessary Metadata - Images often contain hidden metadata like GPS location, camera details, and timestamps that are not needed on a website and could pose privacy or security risks.
- Recommended share image size: At least 1200 x 630 pixels for optimal display on high-resolution devices.
This size helps ensure your image appears sharp and correctly formatted in the post preview.
Learn more about the best practices for image sizes and optimization here.
You can also learn more about the Calendar Features here.