Quickly show appreciation for those who support you.
Available for all plans on the Locable Marketing Platform
Businesses and nonprofits often rely on sponsors for their organizations, events, fundraisers, and more. Recognizing sponsors on your website not only shows appreciation but also strengthens these valuable partnerships.
Pro-Tip: This tool isn’t limited to just sponsors; you can also use it to recognize other groups of businesses, such as high-level members, new businesses in the community, or any other group you'd like to highlight, providing flexible options to showcase meaningful connections.
With Locable’s Sponsor Embed Tool, you can easily create groups of businesses and seamlessly display their logos, complete with links to their websites. Whether you’re showcasing sponsor support for an organization-wide initiative, a specific event, or a campaign, this tool makes it effortless to give your sponsors the recognition they deserve.
In this article, we’ll guide you through:
- Creating a Sponsor Recognition Embed: Learn how to set up your group of sponsors.
- Adding Sponsors to the Embed: Step-by-step instructions for including sponsor details and logos.
- Embedding Sponsors on Your Website: Discover how to add your sponsor group to an entire website, a single webpage, or within an event listing or blog post.
Our tool offers the flexibility to display sponsor logos in either a grid layout or as a carousel (slider), ensuring you have the right format for any context. For instances where a dedicated sponsor page is needed, you can also use a directory to provide more comprehensive recognition.
Powered by Local Connections™ Integration
As part of Locable’s suite of Local Connections™ tools, the Sponsor Embed leverages data from your CRM for Companies and Causes. This means that sponsors must first be added to your CRM. Once added, you can manage, categorize, and display sponsors effortlessly—either by adding them directly or through various integrated channels.
Creating Your Sponsor Embed
To create meaningful sponsor groupings, you'll want to tailor each embed to serve a specific purpose, such as recognizing sponsors for a particular event, campaign, or organization-wide initiative. This approach ensures that each grouping highlights the right sponsors in the most relevant context, providing targeted recognition that maximizes their impact.
You can create a Sponsor Embed by going to Embeddable Resources > Sponsor Embeds then click Create Sponsor Embed.

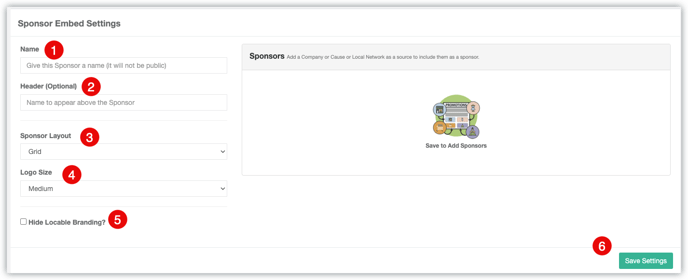
From here, you can add the initial settings to create the embed:

-
Name - You will want to give the sponsor embed a clear and descriptive name. This will be helpful when you choose the embed to add to your various events or web pages, etc.
-
Header - Here you can add an optional title/label that will appear above the group of sponsors on the public-facing view. For example, 'Thank you to our Generous Sponsors', or 'Diamond Level Members' when recognizing groups of companies. Alternatively, you can add information to the page wherever you embed this.
-
Sponsor Layout - Choose between a static grid and a sliding carousel.
-
Logo Size - For a grid layout, you can choose to have the logos be Small, Medium, Large or Extra Large in size. Medium is the default size And no matter the choice, the logos will be centered in the row on the page.
-
Paid accounts can hide Locable branding when embedding on 3rd party websites.
-
Click Save Settings to complete the creation of the embed.
NOTE: Logos are added in the Company Record of the CRM or by the company if they have claimed their business profile. For the Grid layout, the logo will display in the following sizes on the screen:
- Small: 80x80 px
- Medium: 120x120 px
- Large: 160x160 px
- Extra Large: 200x200 px
Managing Sponsors in your Embed
Once created, you can manage the sponsors/businesses that are to be included in this grouping.

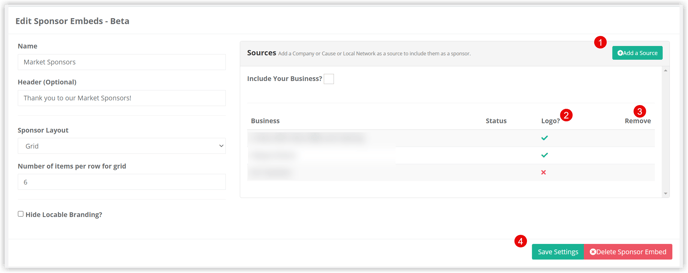
- To add a company, click on Add a Source and select the company from your CRM. If the company does not already exist in your CRM, you will need to add it first.
- Make sure the sponsor’s logo is included in the company's CRM record, as companies without logos will not be displayed alongside other sponsors. NOTE: a square logo 200x200px will work best.
- Once a company is saved in the embed, you have the option to Remove companies by selecting the appropriate checkbox.
- Finally, click Save Settings to apply your changes.
NOTE: Deleting this embed will remove it permanently and any page it's been installed on will show an error message - be sure to uninstall it first. You can always save it for later without it being used.
Embedding Sponsors on Your Website
The Sponsor Embed tool makes it easy to showcase your sponsors wherever you need to. You can embed a sponsor group in multiple places, depending on your goals:
- Single Webpage - Highlight sponsors on a specific page (for example, your high-level “Supporters” or “Partners” displayed on your home page). You can do this by following the guidance here: Understanding your Embed Tools
-
Event Posts or Blog Posts - Give sponsors more visibility by embedding the group directly into related event pages or blog posts.
Adding a Sponsor Embed to an Event Post
When publishing your event post, you can choose to display the event sponsors by selecting the specific Sponsor Embed group here:

You can choose one sponsor embed to appear with an event post.
The sponsor logos will display along with the optional Header included in the Sponsor Embed. If no header is included, it will simply be titled 'Sponsors' above the logos.
Adding a Sponsor Embed to a Blog Post
You can embed the Sponsor group directly into related blog posts. You will need to copy the embed code from the Sponsor group:

Then create a section in your blog post that uses the 'Full Image' layout (adjust the layout for the section using the arrows at the bottom) and add the embed code:

No matter where you place the embed, it will automatically update whenever you make changes to the sponsor group in your account, saving you time and ensuring your website always looks professional.
