![Locable Logo 3a3a3a Gray.png]](https://help.locable.com/hs-fs/hubfs/Locable%20Logo%203a3a3a%20Gray.png?height=50&name=Locable%20Logo%203a3a3a%20Gray.png)
Available for all plans on the Locable Marketing Platform
Locable’s Form Builder: Powerful, Simple, and Integrated
Locable’s form builder is both powerful and easy to use, making it simple to collect information and engage with your audience. Learn more about different form tool uses here.
Even better, all form submissions automatically connect to your CRM, helping you track and manage contacts effortlessly. When someone submits a form on your website, their information is either added as a new contact or updates an existing record in your CRM.
To access your forms, go to Marketing Tools > Forms in your account.
Things to Know About Locable’s Form Builder
- Plan-Based Access – Access to form tools may vary based on your plan. Check our Pricing Page to see what’s included in your subscription.
- Easy Website Integration – For websites Powered by Locable, you can add forms directly to webpages, blog posts, and events. If your website is on another platform, use the JavaScript or iFrame embed codes found in each form’s settings.
- CRM Integration – All form submissions are automatically recorded in your integrated CRM. If the submitter’s email matches an existing contact, their record will be updated with the new submission details.
- Seamless Editing – Need to make changes? No problem! You can edit forms anytime without reinstalling them on your website.
Basic Form Types
When creating a form, the first step is to define its settings, including selecting a Form Type.
Locable offers three types of forms:
- Standard Form – A versatile form for general use, such as inquiries, registrations, or feedback.
- Instant Contact Form – A streamlined form designed for quick submissions and immediate CRM entry.
- Double Opt-in Newsletter Subscribe Form – A subscription form that requires users to confirm their email before being added to your mailing list.
Once you select a Form Type, additional settings specific to that type will appear, allowing you to customize the form to fit your needs.

NOTE: You will use the Standard form for all general forms on your website.
Form Builder Basics
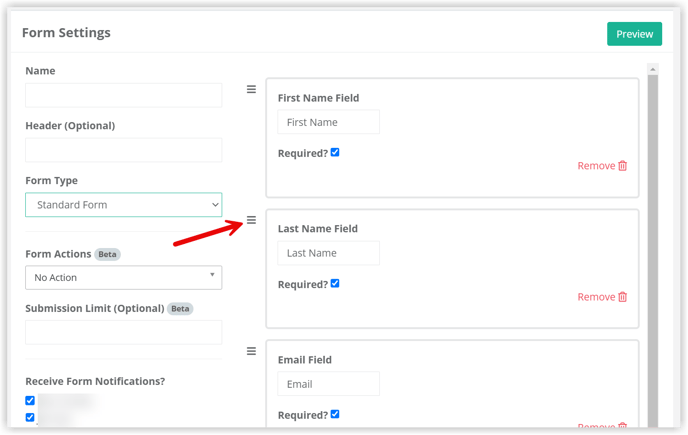
You can customize each form to fit your needs by selecting the fields to include and choosing which ones should be required.
💡 Best Practice: Keep forms as short as possible to improve completion rates. If you need to collect more detailed information, balance the number of fields with the importance of the data you're requesting—too many fields can discourage submissions.

You can quickly create forms or take a couple of minutes to utilize more advanced features.
- Give your form a descriptive name so you can stay organized.
- These fields are currently in your form - you can adjust the label, make it required, reorder the fields, and add options (depending on field type).
- These are available field types when building your forms. You can customize the 'label' for each form field once you add it to your form.
A FEW THINGS TO NOTE:
Use the Content Block field to add text between form inputs—great for creating sections, adding headings, or providing context or instructions. This field is for display only and doesn't collect user data.
If you choose the Date field option, it will require an input of the date AND the time on the form. If you prefer to only require a date input, you may want to use a Text Field instead.
File Upload Limitation: Each form supports only one File Upload field. If you need to collect additional files, use Form Actions to automatically send an email with further instructions and request the additional files via email.
ALSO: Once you link your Stripe account to your Locable account, the Price field will be enabled. Learn more about accepting Form Payments. - Add an optional Heading to appear above your published form on your website.
- Choose your Form Type - a Standard form, an Instant Contact Page™, or a Newsletter Subscribe form. (NOTE: You also have the option to add a Newsletter Subscribe option to a Standard or Contact form.)
- Form Actions enable you to decide what happens when someone submits the form - showing content is HIGHLY recommended. Show a confirmation message, include an optional button to link to a follow-up action, and more. Learn more about using Form Actions here.
- Optionally, send a form submission confirmation email. This can restate the confirmation message or be completely different, you can customize your reply-to email address and subject line and email message.
- Add an optional PDF content download to be included with the confirmation email.
- Some forms have a limited number of submissions, especially when used for event registrations.
- Choose who gets notified when a form is submitted. Only users on your account can be notified - you can always add more users.
- Paid accounts can hide "Powered by Locable" when their form is viewed.
- Advanced Styles enable you to add custom CSS and styles to your form.
- Newsletter Subscribe Opt-In field - By adding this field to your form, you can set up your form to automatically add anyone who submits the form to a specific contact list. Once the opt-in field is added, you’ll be able to choose which existing contact list(s) those subscribers should be added to when they submit the form. This way, your contact lists grow automatically with each submission.
- Forms can be embedded on any webpage. If your website is not powered by Locable, then you'll need to use the provided embed code. Otherwise, you can do it through our web builder.
NOTE: You can reorganize and move the field in the form by clicking on the 3 lines to the left of the field and dragging it up or down to the desired location in the form.
Accessing Form Submissions
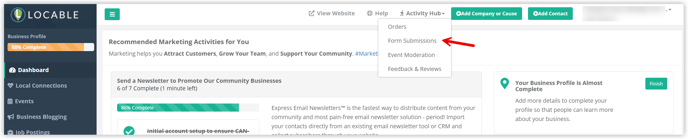
Once the forms are submitted, you can access submissions on your dashboard or by clicking Activity Hub > Form Submissions.
Exporting Form Submission Data
If you need your submission data in a spreadsheet or to use with other tools, you can download your form submissions by clicking the download icon to the right of the form name on the Form Submissions page.
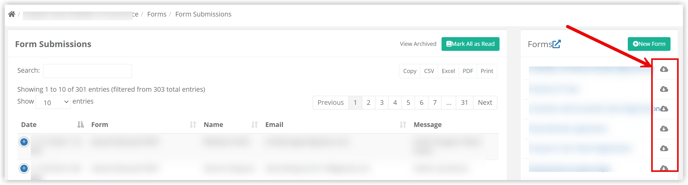
This action will initiate the download of an Excel spreadsheet that displays comprehensive input data from every field within your form. The top row of the spreadsheet will display the labels of your form fields, while the subsequent rows will present the specific information associated with each respective field.
This spreadsheet will be emailed to you once its creation has been completed.
Archiving Form Submission Data
You have the option to archive form submissions if you like. You can click the red Archive button next to the form submission, and it will place it in the Archived area.

NOTE: Depending on your screen size, you may see the buttons to the right of the Form details, or you can click the + icon to the left to access the buttons.
There is also an Archive option when you View the form submission:

You can view Archived submissions by clicking View Archived at the top of the submission data.

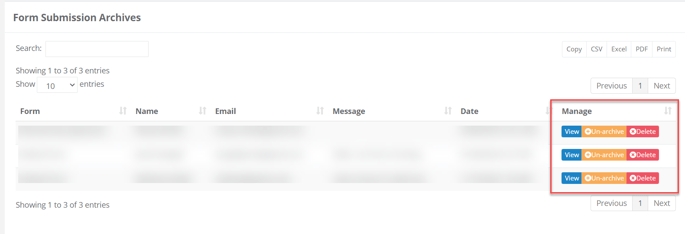
Form Submission Archives
Here, you have the option to view the archived submission data, Un-Archive it, or Delete it forever.
Forms can also be paired with events to enable you to collect and track event registration. Learn more about event registration here.