Quick Posts are simple-to-create blog posts.
Available for all plans on the Locable Marketing Platform
Quick Posts are like creating content for your website like you would create a status update on social media. They're meant to give you a quick option of posting content and updates about your business, industry, or community.
Like the other content types, Quick Posts appear on your listing, your Blog page, or any other page where you have the content feed installed.
The quick post is a great option when you have a message that can be easily supported with a single picture or video, and can include as much content in your message as you like.
Creating a Quick Post
To create a quick blog post, go to Business Blogging > New Blog and then select Quick Post.

Quick post blogging is available to all Locable accounts, including our 'always free' Engage accounts.
You can see here that Guided Blogging is also available in your Locable account, but does require an upgrade to a paid account.
Now, add the details
A quick post will allow you to focus on a clear and concise message without spending much time worrying about the formatting.

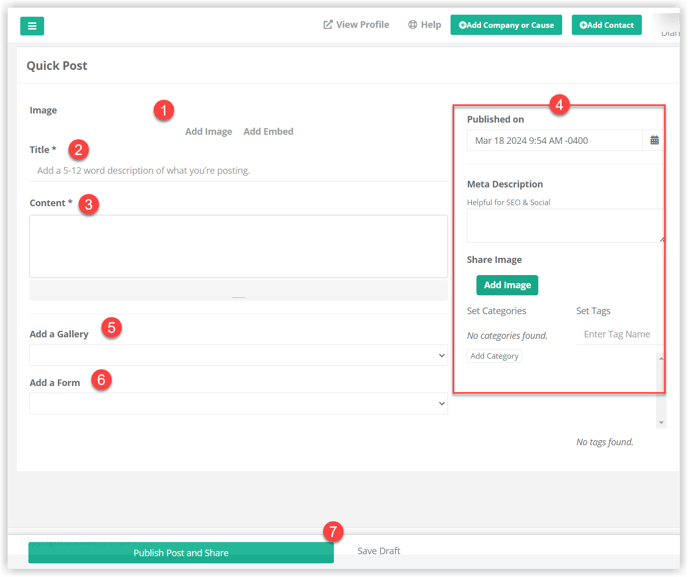
- Image or Media - Every post should have an image or other media that can be added through the Add Embed option (such as a YouTube Embed).
If using an image you can either Upload a new image or Browse images already uploaded to your Media Library. It's completely acceptable to reuse images in multiple ways. Just make sure the image is relevant in each case. - Title - This is critical for readership, social media engagement, and even SEO. Keep it clear and simple but include enough that people know what it's about and it includes keywords or phrases that will resonate with your audience.
- Content - This is the guts of the post. It doesn't have to be long, it can be formatted using our text editor to include lists, bullet points, or other details. Use this area to tell a story about what happened, why it happened, how you did it, and any challenges you faced in the process.
- Advanced Settings - every post type enables you to customize certain 'behind-the-scenes' aspects of your posts. You have the option to choose when to publish your post, and you can add a Meta description and Share Image (used when sharing the blog post link to social media). You can also categorize your blog post! Learn more about the use of categories and tags here.
- Add a Gallery - You can include a published Gallery of images with your post. The Gallery would need to be created first, then could be linked here to the blog post. Learn more at Understanding Photo Galleries.
- Add a Form - You can also add a created Form to your post. The Form would need to be created first and then could be linked here to display in the blog post. Learn more about creating forms here.
- Publish Post or Save Draft - You can either click to publish your post (immediately, if you haven't selected a 'Published On' date) OR you can click to save the draft and return later to finish and publish the post.
