![Locable Logo 3a3a3a Gray.png]](https://help.locable.com/hs-fs/hubfs/Locable%20Logo%203a3a3a%20Gray.png?height=50&name=Locable%20Logo%203a3a3a%20Gray.png)
Available for the Coordinate plan on the Locable Marketing Platform
As your membership base grows, you can efficiently manage it directly from your account. This includes:
- Adding new members
- Updating or modifying existing memberships
- Deactivating memberships as needed
Adding a New Membership
As new members are added to your organization, you will need to be sure the company or organization is first added to your CRM, and that the primary and billing contact is also added to your CRM. See more about adding to your CRM here.
Once you have confirmed that the member details are added to your CRM, you will need to add their Membership to your account. This can be done by clicking Add Membership in the Company Record (for a company membership) or the Contact Record (for an individual membership). Alternatively, you can add a membership by going into CRM > Membership.
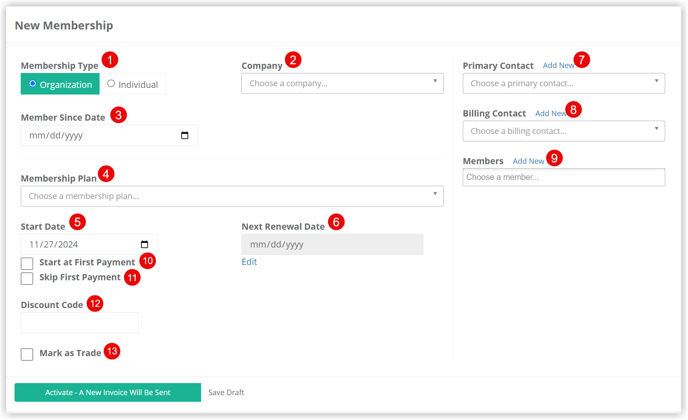
For each membership, you will need to define the following details:
- Membership Type - identify if this is a company/organization membership or if it is an individual membership. If you create a company/organization membership, then the membership will link to the company record in the CRM. If you create an individual membership, then the membership will link to the contact record in the CRM.
-
If you've identified this as an organization membership, you will need to identify the Company. This dropdown will show all companies in your CRM. If you've identified this as an Individual membership, the dropdown will show all contacts in your CRM.
- Member Since Date - You can store the date that the member first joined. This way if their membership ever lapses, or they end their membership and rejoin later, you have a record of their original start date.
-
Membership Plan - choose the membership plan that the member has chosen. These are the plans you have defined in your Membership Settings.
-
Indicate the Start Date of the membership. This can be the current date, a date in the past, or a date in the future.
-
The Next Renewal Date will populate based on the start date entered and the settings for the membership plan defined above. If you need to edit the renewal date, click 'Edit'. This will prompt you to confirm you want to edit the renewal date to be other than what the membership plan has defined. Once you confirm, you can edit the renewal date.
-
Primary Contact - Choose the main contact for this membership from the dropdown list. The list will display all contacts in your CRM.
-
Billing Contact - Choose the billing contact for this membership from the dropdown list. The list will display all contacts in your CRM. Any invoicing for the membership will be emailed to the billing contact.
-
Members - Choose the members for this membership from the dropdown list. The list will display all contacts in your CRM. You will be able to add members based on the number of 'seats' defined in the membership plan. Adding multiple members will allow those members to participate and receive member benefits through your site - member pricing if you have that defined for any items on your website, for example. It will also give them access to create an account with the Membership Profile link and have access to the Membership Resources displayed there, if you have added any.
-
Start at First Payment - You will want to click this checkbox if you are setting up the membership BEFORE they have paid the membership fee. By selecting this option, the system will generate and send an invoice for the membership fee to the billing contact, and once payment is made the start date will populate. If you don't click this checkbox, the start date of the membership will be the date identified in the Start Date field (above).
-
Skip First Payment - You will want to click this checkbox if you are setting up the membership AFTER they have paid the membership fee. By selecting this option, the system will wait to generate an invoice for the member until the next renewal date.
-
Discount Code - This would be a code provided to you by Locable, allowing members to sign up for Locable's paid services with a discount. Reach out to us if you would like to have a discount code to offer your members.
-
Mark as Trade - You will want to click this checkbox if you are setting up a membership that does not require payment of the membership fee. An invoice will be generated and marked paid at the same time, showing a record of the membership fee being covered 'in trade'.
Once you have completed the membership details, click 'Activate' to create the membership. If you need to come back and add more details later, click 'Save Draft' to save what you have input so far.
Managing Memberships
Once your memberships are added to your account, they will primarily be managed through automation.
You can view all of your Memberships by going to CRM > Memberships:
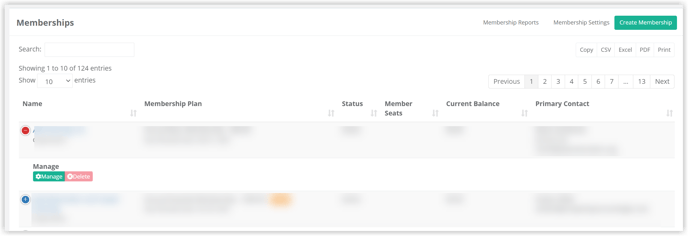
In this area, you can see an overview of your Membership accounts.
-
Name - The Company/Organization or Individual member name
-
Membership Plan - Showing the membership plan and the next renewal date for this membership
-
Status - will indicate if this is an Active or Inactive membership.
-
Member Seats - Indicates how many seats are still available to be assigned to other contacts for this membership.
-
Current Balance - At a glance, you can see which memberships have an outstanding balance.
-
Primary Contact - the contact details for the primary contact of the membership, as defined in the membership details
Clicking the + button to the left of the Name to Manage or Delete the membership.
NOTE: You are unable to delete a membership that is active and/or has a balance due.
Filtering and Printing Membership Details
There are a couple of ways to filter or change how you view memberships in your CRM.
Sort memberships: Click the small arrow beside a column header to change the order of how memberships are displayed (e.g., alphabetical or by date).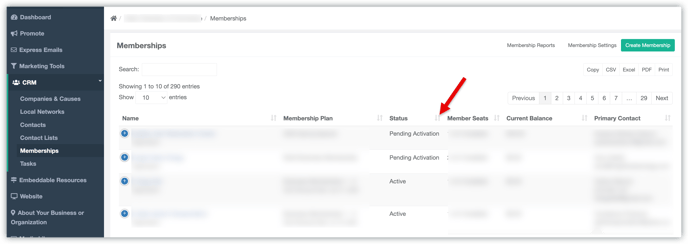
Search and filter: Use the search bar to narrow your view. For example, type “inactive” to only display inactive memberships.
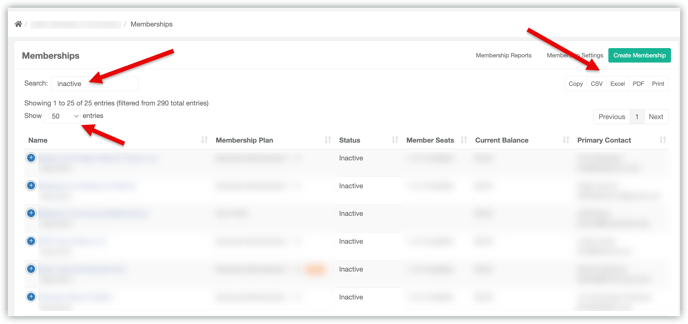
Export or print: Once you’ve filtered your view, you can click to export the results in your view to a spreadsheet or print the details currently shown. You can increase to up to 100 per page view first.