![Locable Logo 3a3a3a Gray.png]](https://help.locable.com/hs-fs/hubfs/Locable%20Logo%203a3a3a%20Gray.png?height=50&name=Locable%20Logo%203a3a3a%20Gray.png)
Available on the Locable Publishing Platform
When you're ready to make your website live, there are just a couple of simple steps to complete. Don’t worry—you don’t need to be a tech expert, and we’re here to help if you have any questions along the way.
Below, you'll find instructions for the access we'll need to help you launch your site smoothly.
NOTE: Domain registrars and DNS providers may offer different tools and settings. If anything looks unfamiliar, just reach out—we’re happy to walk you through it.
We Recommend Managing DNS Through Cloudflare
At Locable, we route all websites through Cloudflare’s advanced network settings to ensure fast, secure, and reliable performance.
To make the most of these benefits, we also recommend that you manage your DNS directly through Cloudflare. Here’s why:
🚀 Start with Cloudflare: A Trusted Content Delivery Network (CDN)
A Content Delivery Network (CDN) improves site performance by delivering content from servers closer to your visitors. While Locable already uses a CDN under the hood, Cloudflare adds another layer of optimization and resilience.
🔒 Enhanced Security at No Cost
Cloudflare’s free service tier offers strong protection against common threats like DDoS attacks, spam, and bots—all while improving page load speed and uptime. This means a safer, faster experience for your site visitors.
🛠 Smarter DNS & Domain Management
Cloudflare also excels in DNS and domain management. If your current domain registrar lacks flexibility or modern features, transferring your domain to Cloudflare can give you more control and better tools to manage your site’s settings.
In short, using Cloudflare improves your site’s speed, security, and reliability, and managing your DNS there puts more powerful tools in your hands.
Create Your Cloudflare Account
To get started, visit https://www.cloudflare.com/a/sign-up and create your free account.
Once your login is set up, you’ll be prompted to add your domain. Cloudflare will then walk you through a quick setup process and automatically import your existing DNS settings—it only takes about a minute and feels like magic.
 Click 'Continue' and then select the Free plan, and your current DNS records will be imported.
Once your current DNS records are imported, you will want to click to 'unproxy' all of the records by clicking to toggle this to DNS only for each record that shows 'proxied'.

You will also need to delete any A records that show a 'Name' that is your domain.
Add new DNS records
Click Add record to create the new DNS records to launch your Locable-powered website:

Create a CNAME record with the following details:
Name: @
Target: sites.locablepublishernetwork.com
This record should be 'proxied' and show the orange color and Cloudflare icon.
Create another CNAME record with the following details:
Name: www
Target: sites.locablepublishernetwork.com
This record should be 'proxied' and show the orange color and Cloudflare icon.

NOTE: If there are any A records for www or the domain name as the 'Name', you'll need to delete those records before you can create the required CNAME records to point to sites.locable.com.
Now you need to add one last CNAME record with the following data:
Name: _acme-challenge.www
Target: 861ad4930e941f98.dcv.cloudflare.com
This record should be 'unproxied' and read DNS only.

NOTE: If your DNS records have any existing NS records, those will need to be deleted.
Once completed, click 'Continue to activation' to proceed.
Update your Name Servers
Wherever your domain is registered (often GoDaddy, NameCheap, or Enom, though we strongly recommend Cloudflare for your domain), you will need to change your name servers to use the two provided in your Cloudflare account.
Once you've updated your domain account with the new Cloudflare nameservers, click the Check Nameservers Now button on your Cloudflare Overview page to expedite the process.

Create a Page Rule
Now that the required CNAME records are added, we need to create a forwarding rule, so if someone types in yourdomain.com, they actually end up at www.yourdomain.com
To do this, go to Rules > Page Rules in the options in the left navigation:

Then click Create Page Rule. You need 1 rule as follows:

- In the URL box, type yourdomain.com/* - using your actual domain with the trailing /*. Then click the Settings drop-down box and select Forwarding URL, and you want to use a 301 Permanent Redirect.
- In the destination box type, http://www.yourdomain.com/$1 - using your actual domain with the https://www. and the trailing /$1.
- Then click Save and Deploy Page Rule.
How Your Website Security Works After Launch
When you launch your Locable-powered website by updating your CNAME records, your domain is securely connected to our platform. This setup ensures that:
-
All website traffic is routed through Locable’s secure infrastructure.
-
Your site is automatically protected by our SSL encryption and other security protocols with no manual setup needed.
-
You can continue using your free Cloudflare account without needing to configure additional SSL settings there.
In short, by pointing your domain to us via CNAME records, you’re getting advanced website security and encryption managed entirely by Locable - simple, safe, and seamless.
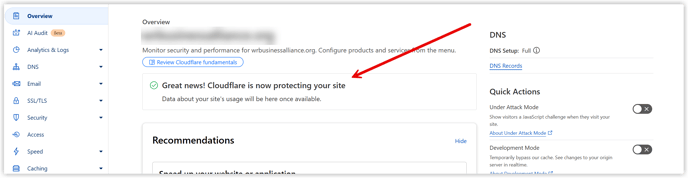
Once the domain nameservers are pointing to Cloudflare, your Overview page will indicate that Cloudflare is protecting your site:
And your Cloudflare Account Home page will show your domain's status updated to 'Active'.

Final Step: Let Us Know You're Ready to Launch
Once your domain points to our servers and your Cloudflare status shows “Active”, you’re almost there!
To complete the launch:
-
Email our Support Team at help@locable.com.
-
Let us know your domain is correctly configured and Cloudflare is active.
-
We’ll take care of the final step to make your new site live.
NOTE: Your website may take some time to fully load as the updated DNS settings finish propagating across the internet. This is normal—just give it a little time.
Once your site is live, you’ll log in using your new website URL. Your username and password stay the same, and you can immediately resume posting content and managing your site.
🎉 That’s it—you’re all set!