![Locable Logo 3a3a3a Gray.png]](https://help.locable.com/hs-fs/hubfs/Locable%20Logo%203a3a3a%20Gray.png?height=50&name=Locable%20Logo%203a3a3a%20Gray.png)
Available with the Community Engagement Core Plus and Max plans on the Locable Marketing Platform.
Points of Interest allow you to add and manage locations in your Locable CRM that aren't businesses or organizations.
For example, you might create Points of Interest for:
- Historic landmarks or buildings
- Murals and public art
- Parks and public spaces
- Monuments and memorials
- Scenic locations
- Trailheads
- Other local attractions or places visitors may want to discover
Points of Interest can be used as Stops in Tours, allowing you to include these locations alongside Companies from your CRM.
NOTE: If the location you want to feature is a business or organization that already exists as a Company in your CRM, you do not need to create a separate Point of Interest for it.
Create a Point of Interest
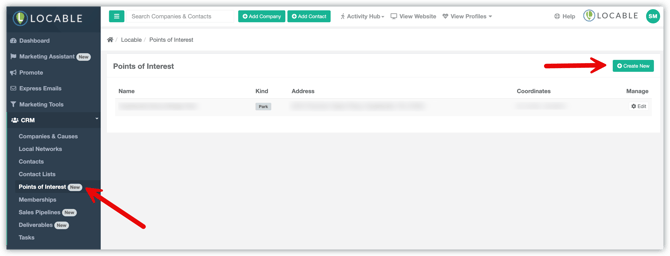
Navigate to CRM > Points of Interest in your account. Then click Create New to begin.
Add the Point of Interest Details
Enter the information you want to associate with the Point of Interest:
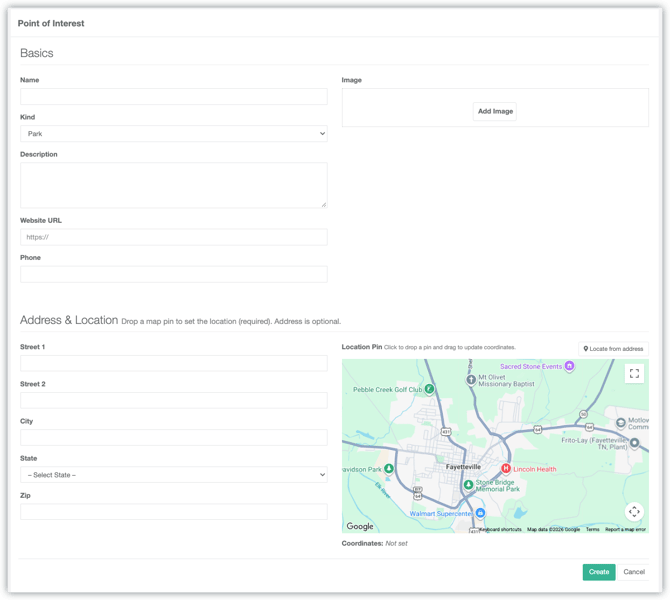
- Name - Enter the name of the location as you want it to appear.
- Kind - Choose the type of location from the dropdown list. A variety of location types are available to help identify what kind of Point of Interest you're adding.
- Image - Add an image that represents the Point of Interest and helps visitors recognize the location.
- Description - Add helpful information about the location, such as its significance, history, features, or what visitors can expect to find there.
- Website URL - Optional. If the Point of Interest has a relevant website or webpage, add the URL here.
- Phone - Optional. Add a phone number if there is a relevant contact number for the location.
- Address & Location Details - The street address is optional, but every Point of Interest must have a location set on the map. Click the appropriate location on the map to drop the Location Pin and set the coordinates for the Point of Interest.
IMPORTANT: A Location Pin is required even if you enter a street address. Be sure to click the map and confirm the Point of Interest's location before creating the record.
Once you've added the details and set the Location Pin, click Create to complete the Point of Interest setup.
Using a Point of Interest in a Tour
Once created, the Point of Interest becomes available when adding Stops to a Tour.
When adding a Stop to your Tour, select Point of Interest as the Stop type, then choose the location from the dropdown list.
See How to Set Up Tours for complete instructions on creating a Tour and adding Stops.