![Locable Logo 3a3a3a Gray.png]](https://help.locable.com/hs-fs/hubfs/Locable%20Logo%203a3a3a%20Gray.png?height=50&name=Locable%20Logo%203a3a3a%20Gray.png)
Available for all plans on the Locable Marketing Platform
Promoting events on your website and beyond is fast and easy with our simple events form.
Your events can appear on your website, be distributed to Google Business Profile (formerly Google My Business), used in your Express Email Newsletter, and pushed to local Community Calendars all at once.
NOTE: Published events will automatically appear on your website once you've created at least one calendar and "Embed it on your website". Learn more about adding a calendar here.
To ensure reliable event data, we require every event to include a title, description, location, date, and time while other fields such as an image, price, and links (to buy tickets, etc) are optional.
To get started, you can add events through a couple of paths...
Go to Promote > Events and select 'New' OR click 'Promote an Event' on your main Dashboard
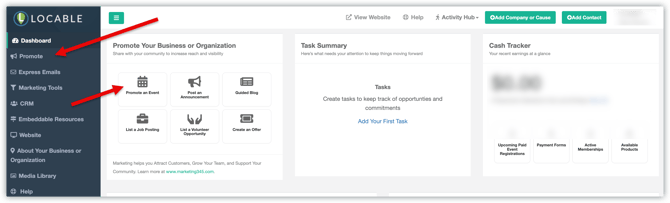
Adding Your Event
Be sure you have the basic details of your event ready when you are creating an event to post on your calendar.
-
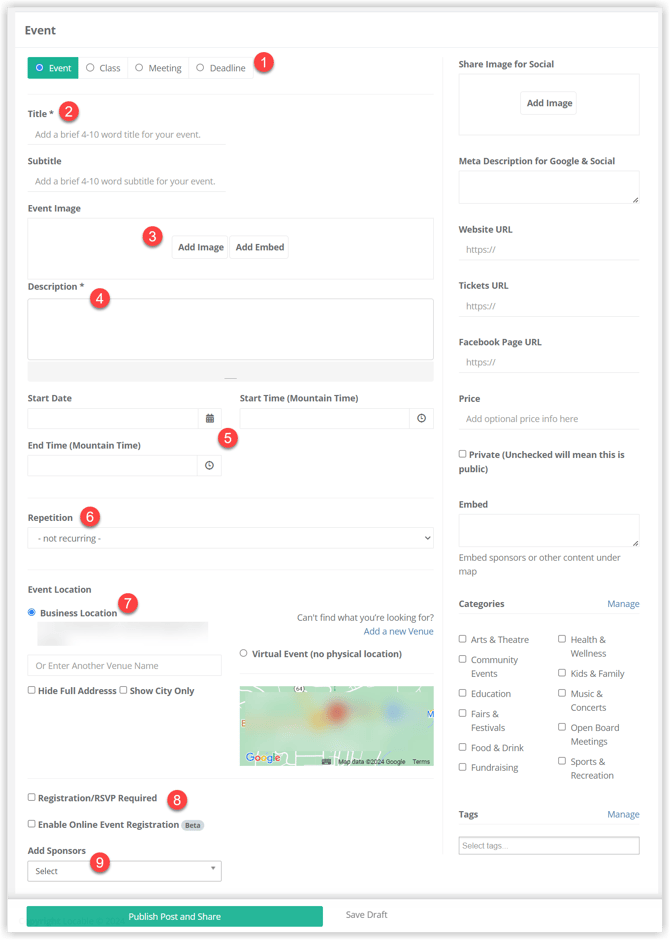
Set The Type of Event - Event, Class, Meeting, Deadline.
-
Title - This is critical for readership, social media engagement, and even SEO. Keep it clear and simple but include enough that people know what it's about and include keywords or phrases that will resonate with your audience.
-
Image or Media - Every post should have an image (Add Image). You can either upload a new image or browse images already uploaded to your Media Library.
We recommend using a photo—like people enjoying a past event or an image that captures the event’s vibe—instead of uploading a flyer as the main event image. Flyers are often packed with text that gets cut off or is hard to read, especially on mobile devices. Plus, because that text is embedded in the image, it’s not readable by screen readers, which means it’s not ADA-compliant.
A clean, high-quality photo draws more attention, works across all devices, and keeps your content more accessible.
Pro Tip: If you want to share the flyer, you can upload it as a downloadable PDF to your Media Library and link to it in the event description!
You also have the option to embed a video here. Please be sure to follow the procedure to properly embed a video on your website.
-
Description - This is the core content of your event post—help people quickly understand what it is and why they should attend. It doesn’t have to be long; bullet points are great!
Be sure to include:
-
What’s happening (activities, entertainment, special guests)
-
Who it’s for (families, adults, kids, etc.)
-
Why it’s worth attending
-
Any important notes (bring a chair, register ahead, etc.)
-
-
Time & Date - Set the date of the event as well as the start and end times. Be sure to use the calendar and clock to set the date and time.
NOTE: When setting the time, you want to use the clock to select AM or PM, then both the hour and the minutes (you need to select 00 even if it's sitting on 00, for example). Then it should fill the field, and you can move on to the next.
- Repetition - If this is a recurring event, you have the option to set the schedule to Daily, Weekly, Monthly, or Yearly.
When Your Event Has the Same Time Each Day: If your event repeats on multiple days with identical start and end times, you can use the recurring event schedule feature:
-
Set the start time and end time for your event.
-
Set the schedule for your event.
-
Post the event for the first date with its specific start and end time.
-
After publishing, use the “Copy Event” feature to clone/duplicate the event.
-
Update the date and times for the new instance.
-
- Location - You can set the location of the event - it will default to your business's location, but you can adjust this if needed - including making it virtual. If the location doesn't appear in the dropdown, simply click Add a New Venue link to the right. That venue will then be available for use in the future as well.
- You have the option to require an RSVP or Online Event Registration and/or payment for the event (depending on your plan).
- If your Event has Sponsors, you can profile those sponsors in the event listing using our Sponsor Tool.
NOTE: When adding your image for the event, a 'preview image' will be viewed in the full Calendar. The preview image is 4:3 aspect ratio - anything larger than 640x480 will be cropped to fit. Once the event post is opened, the full image will appear.
Additional Event Settings
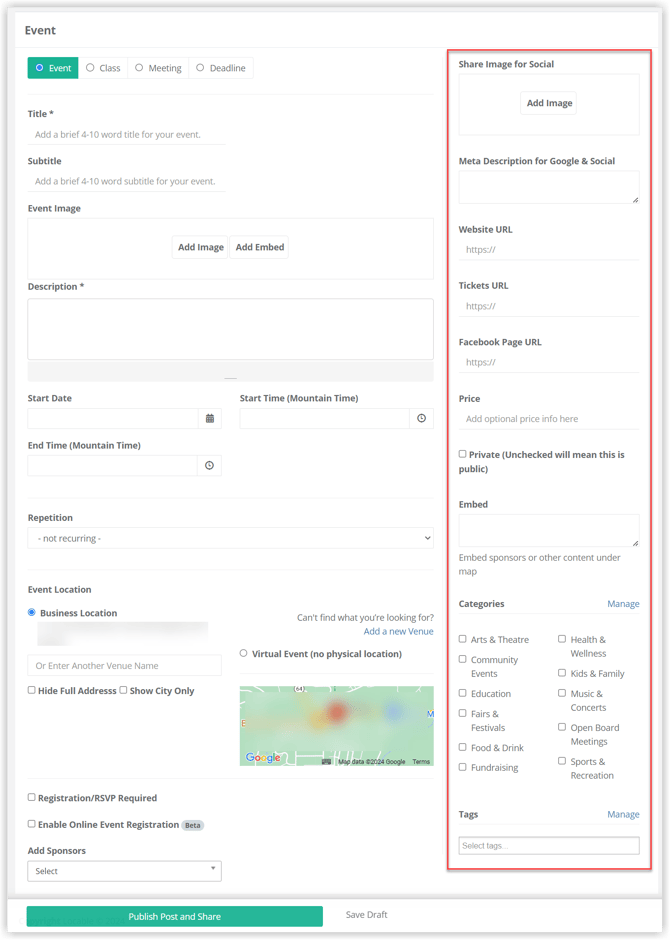
Every event you create in Locable has its own settings that help you control how the event is displayed, shared, and organized.
These settings can help improve your event's visibility in search results and on social media, provide visitors with additional information and registration options, and control how your event appears across connected community calendars.
Share Image
The Share Image is the image associated with your event when someone shares the link to your event post on social media or other platforms that support link previews.
A relevant, engaging image can help your event stand out and encourage people to click through to learn more.
NOTE: The Share image will be displayed as the preview image in the calendar, and will be the thumbnail image shown when the event is shared to social media.
If you are creating a specific image for this space, the rendered size of the preview image on the calendar is 275 × 215 px.
Meta Description
The Meta Description is a short summary of your event that helps search engines understand what the event page is about. Search engines may display this description beneath your event's title in search results, giving potential attendees a preview of what they'll find.
-
Aim for approximately 150–160 characters, although search engines may display more or less.
Website URL
The Website URL field allows you to link to a website or webpage specifically associated with the event. This is useful when an event has a dedicated website with additional information beyond what's included in your Locable event post.
Tickets URL
The Tickets URL field allows you to direct visitors to an external website where they can purchase tickets or register for your event. This is useful when ticket sales or registration are managed through another platform.
TIP: If your Locable plan includes Event Registration (available with the Grow plan and above), you can collect registrations directly through your event post instead of directing visitors to an external website.
Facebook Page URL
If you've created a Facebook Event for the same event, you can include its URL here. This provides an additional way for visitors to connect with your event and find related activity on Facebook.
TIP: We recommend using your Locable event post as the primary destination when promoting your event. This keeps visitors on your website, where they can explore additional content, businesses, and community resources.
Price
The Price field allows you to indicate the cost of attending your event. Providing pricing information helps visitors understand whether an event is free or requires payment before deciding to attend.
Private
The Private setting controls whether your event can appear in other calendars through Locable's connected community network.
NOTE: When Private is checked, your event will not appear in community calendars or other calendars where your company is included.
Embed
The Embed field allows you to add an embedded widget or other external content to your event post. Embedded content appears below the map on your event's detail page.
This can be useful when you need to include an interactive feature or third-party tool that isn't otherwise available within the event post.
NOTE: External embed code is controlled by the third-party provider and may not always display or function correctly within your website.
Categories
Event Categories help organize events into broader groups, making it easier to manage and display specific types of events in your community calendars. Categories can help visitors find events that match their interests and allow you to organize event displays around different types of activities.
For example, categories might include:
- Festivals & Celebrations
- Live Music
- Arts & Culture
- Business & Networking
- Family-Friendly Activities
Tags
Tags provide another way to connect events that share specific topics, themes, or characteristics.
Learn more about managing Categories and Tags
Save Draft - You can save the draft of your event to complete and publish later.
Once you've entered your event details and reviewed your settings, click Publish Post and Share to publish your event. Your event will then appear in your website's embedded calendar and be displayed on a mobile-friendly, search-optimized event page.
Pro-Tip: Create recurring events and clone similar events to save time.
After Publishing
Once your event is published, Locable will guide you through options to categorize your event on connected community calendars and share it through Facebook and Google Business Profile. Learn more in How to Share and Distribute Your Events with Locable.
You can also learn more about the Calendar Features here.