![Locable Logo 3a3a3a Gray.png]](https://help.locable.com/hs-fs/hubfs/Locable%20Logo%203a3a3a%20Gray.png?height=50&name=Locable%20Logo%203a3a3a%20Gray.png)
Available for all plans on the Locable Marketing Platform
Locable's Form Builder makes it easy to collect information, accept applications, gather feedback, manage registrations, and engage with your audience.
Forms are integrated with your Locable CRM, so every submission is automatically associated with the contact record of the person who submitted it. This helps you maintain a history of interactions without manually transferring information between tools.
To access your forms, navigate to Marketing Tools > Forms in your Locable account.
Things to Know About Locable’s Form Builder
- Plan-Based Access: Form features may vary depending on your plan. Check our Pricing Page for details.
- Flexible Website Integration: Forms can be installed directly on websites Powered by Locable or embedded on external websites using the provided embed codes.
- CRM Integration: Every submission is linked to the submitter's contact record in your integrated CRM.
- Easy Updates: You can edit existing forms without reinstalling them on your website.
Creating a New Form
Navigate to Marketing Tools > Forms and select the option to create a new form.

The first step is to choose the type of form you want to create. Locable offers three basic form types:
- Standard Form: A versatile option for general uses, including inquiries, applications, registrations, surveys, and feedback.
- Instant Contact Form: A streamlined form designed for quick submissions and immediate CRM entry.
- Double Opt-in Newsletter Subscribe Form: Allows visitors to subscribe to your email newsletters by confirming their email address.
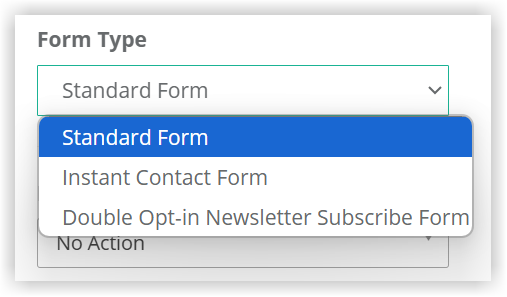
Once you've selected a Form Type, additional settings specific to that type will become available.
NOTE: For most general forms on your website, you'll use the Standard Form option.
Form Builder Basics
The Form Builder allows you to customize the information you collect, how your form appears, and what happens after someone submits it.
You can add fields, adjust their labels, select which fields are required, and configure additional options.
Best Practice: Keep your forms as short as practical. Only request information you need. Longer forms can discourage visitors from completing them.

Configuring Your Form
The numbered areas in the screenshot correspond to the following settings:
- Form Name: Give your form a descriptive name so it's easy to identify and manage in your account.
- Form Fields: Review and customize the fields you've added. Depending on the field type, you can change labels, make fields required, reorder them, and configure available selections.
- Available Field Types: Choose from the available field to collect the information you need. You can customize each field's label after adding it to your form.
A few things to know about specific fields:
Content Block: Add headings, instructions or explanatory text between form fields. This is for display only and doesn't collect information.
Date field: The date field requires both a date and time input. If you only need a date input, consider using a Text Field instead.
Price: Once you link your Stripe account to your Locable account, the Price field will be enabled. Learn more about accepting Form Payments. - Form Heading: Add an optional Heading to appear above your published form when displayed on your website.
- Form Type: Choose a Standard form, an Instant Contact form, or a Newsletter Subscribe form. (NOTE: You also have the option to add a Newsletter Subscribe option to a Standard or Contact form.)
- Form Actions: Choose what happens after someone submits the form. We recommend displaying a confirmation message so visitors know their submission was received. You can also include a button directing them to another page or next step. Learn more about using Form Actions here.
- Confirmation Email: Optionally send an email to the person who submitted the form. Customize the subject line, reply-to address, and message.
-
PDF Download: Add an optional PDF attachment to the confirmation email.
-
Submission Limits: Configure a maximum number of submissions when appropriate, such as for event registrations.
-
Submission Notifications: Choose which users on your Locable account should receive notifications when someone submits the form. Only account users can be selected.
-
Powered by Locable Branding: Paid accounts can choose to hide the Powered by Locable branding displayed with their forms.
-
Advanced Styles: Add custom CSS to further customize the appearance of your form.
- Newsletter Subscribe Opt-In: Add an opt-in field that allows visitors to subscribe to your newsletters when submitting the form. You can select which existing contact lists subscribers should be added to.
- Embed Options: Access the options for embedding your form on an external website.
Reordering Fields: To change the order of fields, click and drag the three-line handle to the left of a field and move it to the desired position.

Editing an Existing Form
You can return to the Form Builder at any time to update an existing form.
- Navigate to Marketing Tools > Forms.
- Select the form you want to edit.
- Update the fields, labels, instructions, or settings as needed.
- Save your changes.
Your updates will automatically appear wherever the form is installed, so you don't need to reinstall it.
Previewing and Publishing Your Form
Once you've created and configured your form, you'll want to review how it appears before making it available to visitors.
Use the Preview option to review your form, then install it within a webpage, event, or blog post where visitors can find the relevant information and complete the form.
For instructions on previewing, installing, and sharing your form, see How to Preview, Publish, and Share Forms.
Managing Form Submissions
When someone completes a form, their submission is saved in your Locable account and linked to their CRM contact record.
You can review submissions, export responses, archive completed submissions, and access submission details from the associated contact's Activity history.
For instructions, see How to View and Manage Form Submissions.